This week we will be presenting our ideas and research for our final project.
Our group has decided to create a running jacket with feedback LED's that will assist in training for marathons such as the Sun Run.
The initial feedback and programming will be based off of the Sun Run training program.
Found some interesting projects that were sort of similar to ours, specifically an LED lit bike jacket. The bike jacket's only purpose is to give extra light for riding at night. We wanted our jacket to have further function by giving feedback on training.
Monday, March 26, 2012
Wednesday, March 21, 2012
Week 11: Final Sketch Prep
This week we have formed our groups for the final project. We have 5 members in our group now, each of us with strengths that we can use towards making an amazing project.
For monday our group will be handing in a deliverable, our first chance to showcase our groups talents, and work together.
This week we also handed in our final reading assignment. We were to choose 1 reading out of a selected list. The reading I chose was on Sprout I/O. I found this extremely interesting. Sprout I/O is intended to be an interactive textile interface. It was inspired by the way threads in a carpet react to weight when they are stepped on, and how they retain their shape once the weight is removed.
I chose this one not only because I found it extremely interesting, but it reminded me of another project that I had learned about, an interactive display where the colour shapes and textures change depending on the light and speed of the display.
The display is made up of multiple small spinning discs with black and white patterns on it. Depending on the speed and direction that the discs spin, it creates the illusion of texture and different patterns. The intended purpose of this installation, is to create an interactive art and display experience, something that may be found in museums or even night clubs.
I first learned about this projet at Siggraph 2011 here in Vancouver, I worked with the creator Yoichi Ochiai for the majority of my time at Siggraph. Here I learned all about his explorations in interactive media and arts.
More can be found on his work here: http://96ochiai.ws/cyclonedisplay.html
Overall I would love to see more works such as Sprout I/O and Cyclone Display, and to learn more about the ideas and technologies behind them.
Week 10: Sketch 2 Presentations
This week we handed in our sketch 2. Our group managed to finish an awesome scarf, completely hand knitted by my partner Francesca. Sewn in was a small servo motor that was re-programmed to rotate 360 degrees, in order to tighten the scarf comfortably around the wearers neck.
The servo motor that we used was originally intended to only rotate 180 degrees, which was then reprogrammed so that it would go 360 degrees.
there was a thread tied to the wheel on the motor, that would slowly wind around the motor, pulling the inside of the scarf closer to the users neck.


 Overall our presentation went well. We were asked to bring the project in again to lecture Wednesday for further inspection, as during our initial presentation the motor had burnt out.
The servo motor that we used was originally intended to only rotate 180 degrees, which was then reprogrammed so that it would go 360 degrees.
there was a thread tied to the wheel on the motor, that would slowly wind around the motor, pulling the inside of the scarf closer to the users neck.


Monday, March 5, 2012
Week 9: Motors
This week in lab we will be focusing on working on sketch 2, and learning about using motors with arduino.
Servo Library : Library for controlling motors in Arduino
examples: servo: - here you can find different example patches for the different motors.
For our sketch 2, we will be using a round servo motor. it has 3 wires.
Black - ground
red - 5volt arduino
yellow - signal wire
The following week will be working on sketch 2 in class.
For the rest of this class, will be showing off our in lab assignments of our first textiles.
For our group, we got the code fully working with the bread board, using a button to turn the lights on and off, alternating between colours.
But when we connected the arduino to our headband, the program didn't work. We had difficulty figuring out the circuit with the conductive thread, but spoke to Greg about our project.
He was impressed with the sewing skills used on the textile, and explained what we would want to do and focus on for our sketch 2 in order to get the textile with the arduino code working together.
We are going to be focusing on making clean circuits in the textile itself, incorporating resistors. Especially making and tail ends of thread extremely short in order to not short out the circuit.
Sketch 2: Progress
Sketch 2 has been going quite smoothly, and from the help of our lab exercises, online resources and teaching staff, we've been heading on the right track with this.
We've settled on creating a scarf that will curl up around your neck to keep you warm when it detects that the ideal temperature in the area around the wearer has dropped down.
So far Francesca has knitted an infinity scarf for our Sketch.
After talking to Greg, we've decided that we are going to use a small round motor that is at the bottom of the scarf (hanging from the wearer's neck) this way, we will be able to create a pully system.
The motor will pull on a string or thread contained within the scarf, winding up to pull the motor closer to the wearers neck.
More updates later.
Week 8 - Learning Wearables
This week the goal is to start working on planning our Sketch 2, as well as working on our soft circuit lab project.
Our group is planning on creating a bracelet for the soft circuit assignment due Wednesday in lecture. By using a slider, we will have the LED light blink faster or slower depending on where the slider is moved.
For our sketch, we are planning on creating a Toque or a scarf with a flower on it, the flower will contain a sensor that will detect either light / moisture or temperature. We are aiming more towards the temperature. The higher the temperature is, the flower will open, but the lower the temperature goes, the flower will close.
The original thought was a hat that detects rain.
Friday, February 17, 2012
Week 7: Reading Break
This week has been coming up with ideas for our sketch 2: interactive textile.
We've decided to create a touque that will be able to detect whether its raining or not. using a moisture sensor, or temperature sensor.
We've decided to create a touque that will be able to detect whether its raining or not. using a moisture sensor, or temperature sensor.
Week 5: Presentations
This week was Sketch 1 Presentations. My partner Francesca and I created a patch for a ball game geared towards Autistic kids.
The overall presentation went well, and we both felt very good about the outcome of the project.
The overall presentation went well, and we both felt very good about the outcome of the project.
Monday, January 30, 2012
Week 4: Demos and Group Forming
For this week we are going over lab patch examples to finish "computer vision" examples.

The main portion of this lab is dedicated to team forming and starting Sketch 1 which will be presented on Monday, Feb 6th.
Sketch 1: Responsive Environment Design
Using a camera as a sensor and using a screen and stereo speakers as an output.
Research needed:
- previous projects similar to this
- other sources and influences
Monday, January 23, 2012
Week 3: Update
This weeks focus has been to create a movie player that you can control through a webcam, as well as being able to change the frame rate, colour exposure and distortion of the image on screen.
First we created the basic movie player:
moving on to have multiple screens that allow us to access the computers built in camera, change the RGB preference and changing the planes of the video.
next patch created allowed us to play a video in one of the following planes or colour values: Red, Green or Blue:
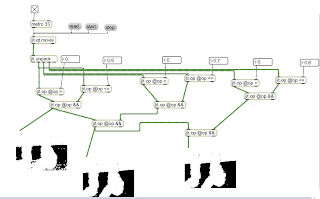
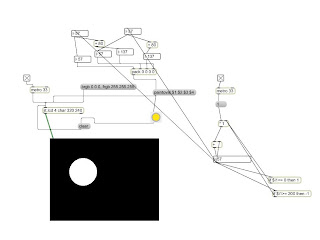
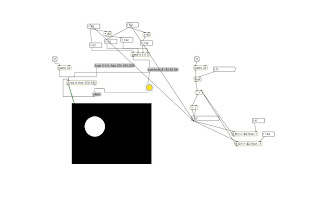
Continuing from here, we now add centroids to our MAX patch, finding the centre of mass of an object in the playing video. There are a matrix of points that create the movie. The dark values create a blob or centroid. Centroids will calculate the centre of this blob.
By adding in buckets and equations we can calculate the speed of the object in the specified space.
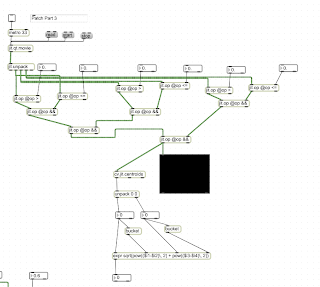
As final product, we were to create a patch of a bouncing ball, which is controlled by the blob detection system of your hand moving in front of a camera. Once this has been completed I will post more on my experiences with this patch!
First we created the basic movie player:

moving on to have multiple screens that allow us to access the computers built in camera, change the RGB preference and changing the planes of the video.

next patch created allowed us to play a video in one of the following planes or colour values: Red, Green or Blue:

Continuing from here, we now add centroids to our MAX patch, finding the centre of mass of an object in the playing video. There are a matrix of points that create the movie. The dark values create a blob or centroid. Centroids will calculate the centre of this blob.
By adding in buckets and equations we can calculate the speed of the object in the specified space.

As final product, we were to create a patch of a bouncing ball, which is controlled by the blob detection system of your hand moving in front of a camera. Once this has been completed I will post more on my experiences with this patch!
Monday, January 16, 2012
Week 2: Introduction to MAX5
Welcome to our introductory lab on MAX5.
Today's lab was a complete introduction to learning the functions of MAX and the interface.
We started off todays creating a simple project:
- adding two intergers using an object stating addition
- adding floating point numbers using an object stating addition
*notice that when you change the right operand, the outcome does not change, you must change the left operand in order for MAX to create a new out put*
We next went to more of a challenge creating an application that would play video.
- start by creating an object for jit.pwindow, this will give you a screen
- another object for jit.qt.movie will allow you to play a quicktime movie.
- 'Message' will act like a button once you lock the patcher. It will open a file folder allowing you to search for playable movie files.
- metro will send a signal to the video player (ie metro 33 will send the signal every 33 miliseconds)
- use a toggle to turn the video (metro) on and off
- create two buttons "start" and "stop"
- the start and stop button will control the actual movie playing, while the toggle will turn off the display
- new button "rate $1" means use the first input given to this object. This dictates the pace of the playback. If it is a positive number, the movie will play faster. If negative number, the movie will play in reverse.
Think of this setup as your TV along with DVD player.
- the Metro and toggle are your TV, controlling the movie player screen.
- the Start, Stop and Rate are your DVD player, controlling the rate of play of the actual movie file.

Animating a bouncing ball
- object for jit.lcd says "lcd display"
- 4 char plane colours,
- 320 240 are the dimensions of the display
- add a video player, metronome and toggle.
- brgb - background colour
- frgb - fore ground colour
- by adding in integers you can change the size and shape of your oval
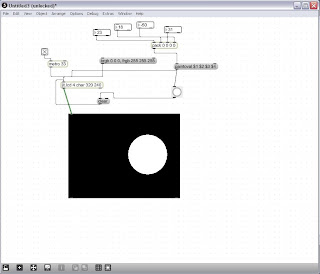
by adding in another counter to the side we were able to control the boundaries where the ball would bounce off.
by adding the float number you are able to control the speed of the bouncing ball
This lab allowed us to gain an understanding of a new progam language that we will be using throughout the semester to create different body interface designs.
Today's lab was a complete introduction to learning the functions of MAX and the interface.
We started off todays creating a simple project:
- adding two intergers using an object stating addition
- adding floating point numbers using an object stating addition
*notice that when you change the right operand, the outcome does not change, you must change the left operand in order for MAX to create a new out put*
We next went to more of a challenge creating an application that would play video.
- start by creating an object for jit.pwindow, this will give you a screen
- another object for jit.qt.movie will allow you to play a quicktime movie.
- 'Message' will act like a button once you lock the patcher. It will open a file folder allowing you to search for playable movie files.
- metro will send a signal to the video player (ie metro 33 will send the signal every 33 miliseconds)
- use a toggle to turn the video (metro) on and off
- create two buttons "start" and "stop"
- the start and stop button will control the actual movie playing, while the toggle will turn off the display
- new button "rate $1" means use the first input given to this object. This dictates the pace of the playback. If it is a positive number, the movie will play faster. If negative number, the movie will play in reverse.
Think of this setup as your TV along with DVD player.
- the Metro and toggle are your TV, controlling the movie player screen.
- the Start, Stop and Rate are your DVD player, controlling the rate of play of the actual movie file.

Animating a bouncing ball
- object for jit.lcd says "lcd display"
- 4 char plane colours,
- 320 240 are the dimensions of the display
- add a video player, metronome and toggle.
- brgb - background colour
- frgb - fore ground colour
- by adding in integers you can change the size and shape of your oval


by adding in another counter to the side we were able to control the boundaries where the ball would bounce off.

by adding the float number you are able to control the speed of the bouncing ball
This lab allowed us to gain an understanding of a new progam language that we will be using throughout the semester to create different body interface designs.
Introduction
Greetings!
Welcome to IAT 320: Body Interface Design. This is going to be an exciting semester, with plenty going on.
This blog will be updated every Tuesday so please check back to see what's new!
Welcome to IAT 320: Body Interface Design. This is going to be an exciting semester, with plenty going on.
This blog will be updated every Tuesday so please check back to see what's new!
Subscribe to:
Posts (Atom)